728x90

dnf install libguestfs-tools

virt-customize -a CentOS-7-x86_64-GenericCloud-2111.qcow2 --root-password password:DDYrTXJZTJldOqimb68ZK5KCmRpbdBOe

[ 0.0] Examining the guest ...

[ 6.4] Setting a random seed

[ 6.4] Setting passwords

[ 7.5] Finishing off


Now able to login to new guest as root / pw.

728x90
728x90

Configure GigaVUE Fabric Components in OpenStack (gigamon.com)

GigaVUE Cloud Suite > GigaVUE Cloud Suite for Third Party Orchestration > Deploy GigaVUE Cloud Suite for Third Party Orchestration > Configure GigaVUE Fabric Components in OpenStack

Configure GigaVUE Fabric Components in OpenStack

This section provides step-by-step information on how to register GigaVUE fabric components using OpenStack or a configuration file.

Keep in mind the following when deploying the fabric components using generic mode:

  • Ensure that the Traffic Acquisition Tunnel MTU is set to the default value of 1450. To edit the Traffic Acquisition Tunnel MTU, select the monitoring domain and click on the Edit Monitoring Domain option. Enter the Traffic Acquisition Tunnel MTU value and click Save.
  • Before deploying the monitoring session ensure that the appropriate Traffic Acquisition Tunnel MTU value is set. Otherwise, the monitoring session must be un-deployed and deployed again.
  • You can also create a monitoring domain under Third Party Orchestration and provide the monitoring domain name and the connection name as groupName and subGroupName in the registration data. Refer to Create Monitoring Domain for more detailed information on how to create monitoring domain under third party orchestration.
  • User and Password provided in the registration data must be configured in the User Management page. Refer to Configure Role-Based Access for Third Party Orchestration for more detailed information. Enter the UserName and Password created in the Add Users Section.

In your OpenStack Dashboard, you can configure the following GigaVUE fabric components:

Configure G-vTAP Controller in OpenStack

You can configure more than one G-vTAP Controller in a monitoring domain.

To register G-vTAP Controller in OpenStack, use any one of the following methods:

Register G-vTAP Controller during Instance Launch

In your OpenStack dashboard, to launch the G-vTAP Controller and register G-vTAP Controller using Customization Script, follow the steps given below:

  1. On the Instance page of OpenStack dashboard, click Launch instance. The Launch Instance wizard appears. For detailed information, refer to Launch and Manage Instances topic in OpenStack Documentation.
  2. On the Configuration tab, enter the Customization Script as text in the following format and deploy the instance. The G-vTAP Controller uses this registration data to generate config file (/etc/gigamon-cloud.conf) used to register with GigaVUE-FM.


    #cloud-config

    write_files:

    - path: /etc/gigamon-cloud.conf

    owner: root:root

    permissions: '0644'

    content:

    Registration:

    groupName: <Monitoring Domain Name>

    subGroupName: <Connection Name>

    user: <Username>

    password: <Password>

    remoteIP: <IP address of the GigaVUE-FM>

    remotePort: 443
    The G-vTAP Controller deployed in OpenStack appears on the Monitoring Domain page of GigaVUE-FM.

    Register G-vTAP Controller after Instance Launch
    Note:  You can configure more than one G-vTAP Controller for a G-vTAP Agent, so that if one G-vTAP Controller goes down, the G-vTAP Agent registration will happen through another Controller that is active.
    To register G-vTAP Agent after launching a Instance using a configuration file, follow the steps given below:
  1. Log in to the G-vTAP Controller.
  2. Create a local configuration file (/etc/gigamon-cloud.conf) and enter the following Customization Script. 


    Registration:

    groupName: <Monitoring Domain Name>

    subGroupName: <Connection Name>

    user: <Username>

    password: <Password>

    remoteIP: <IP address of the GigaVUE-FM>

    remotePort: 443
  3. Restart the G-vTAP Controller service.


    $ sudo service gvtap-cntlr restart
    The deployed G-vTAP Controller registers with the GigaVUE-FM. After successful registration the G-vTAP Controller sends heartbeat messages to GigaVUE-FM every 30 seconds. If one heartbeat is missing ,the fabric node status appears as 'Unhealthy'. If more than five heartbeats fail to reach GigaVUE-FM, GigaVUE‑FM tries to reach the G-vTAP Controller and if that fails as well then GigaVUE‑FM unregisters the G-vTAP Controller and it will be removed from GigaVUE‑FM.

Note:  When you deploy V Series nodes or G-vTAP Controllers using 3rd party orchestration, you cannot delete the monitoring domain without unregistering the V Series nodes or G-vTAP Controllers.

Configure G-vTAP Agent in OpenStack

Note:  You can configure more than one G-vTAP Controller for a G-vTAP Agent, so that if one G-vTAP Controller goes down, the G-vTAP Agent registration will happen through another Controller that is active.

To register G-vTAP Agent using a configuration file:

  1. Install the G-vTAP Agent in the Linux or Windows platform. For detailed instructions, refer to Linux G-vTAP Agent Installation and Windows G-vTAP Agent Installation.
  2. Log in to the G-vTAP Agent.
  3. Edit the local configuration file and enter the following Customization Script.
  4. Restart the G-vTAP Agent service.

The deployed G-vTAP Agent registers with the GigaVUE-FM through the G-vTAP Controller. After successful registration the G-vTAP Agent sends heartbeat messages to GigaVUE-FM every 30 seconds. If one heartbeat is missing, G-vTAP Agent status appears as 'Unhealthy'. If more than five heartbeats fail to reach GigaVUE-FM, GigaVUE‑FM tries to reach the G-vTAP Agent and if that fails as well then GigaVUE‑FM unregisters the G-vTAP Agent and it will be removed from GigaVUE‑FM.

Configure GigaVUE V Series Nodes and V Series Proxy in OpenStack

Note:  It is not mandatory to register GigaVUE V Series Nodes via V Series proxy however, if there is a large number of nodes connected to GigaVUE-FM or if the user does not wish to reveal the IP addresses of the nodes, then you can register your nodes using GigaVUE V Series Proxy. In this case, GigaVUE-FM communicates with GigaVUE V Series Proxy to manage the GigaVUE V Series Nodes.

To register GigaVUE V Series Node and GigaVUE V Series Proxy in OpenStack, use any one of the following methods:

Register V Series Nodes or V Series Proxy during Instance Launch

To register V Series nodes or proxy using the Customization Script in OpenStack GUI:

  1. On the Instance page of OpenStack dashboard, click Launch instance. The Launch Instance wizard appears. For detailed information, refer to Launch and Manage Instances topic in OpenStack Documentation.
  2. On the Configuration tab, enter the Customization Script as text in the following format and deploy the instance. The V Series nodes or V Series proxy uses this customization script to generate config file (/etc/gigamon-cloud.conf) used to register with GigaVUE-FM

    #cloud-config

    write_files:

    - path: /etc/gigamon-cloud.conf

    owner: root:root

    permissions: '0644'

    content:

    Registration:

    groupName: <Monitoring Domain Name>

    subGroupName: <Connection Name>

    user: <Username>

    password: <Password>

    remoteIP: <IP address of the GigaVUE-FM>

    remotePort: 443
  • You can register your GigaVUE V Series Nodes directly with GigaVUE‑FM or you can use V Series proxy to register your GigaVUE V Series Nodes with GigaVUE‑FM. If you wish to register GigaVUE V Series Nodes directly, enter the remotePort value as 443 and the remoteIP as <IP address of the GigaVUE‑FM> or if you wish to deploy GigaVUE V Series Nodes using V Series proxy then, enter the remotePort value as 8891 and remoteIP as <IP address of the Proxy>.
  • User and Password must be configured in the User Management page. Refer to Configure Role-Based Access for Third Party Orchestration for more detailed information. Enter the UserName and Password created in the Add Users Section.

Register V Series Node or V Series Proxy after Instance Launch

To register V Series node or proxy using a configuration file:

  1. Log in to the V Series node or proxy.
  2. Edit the local configuration file (/etc/gigamon-cloud.conf) and enter the following customization script.


    Registration:

    groupName: <Monitoring Domain Name>

    subGroupName: <Connection Name>

    user: <Username>

    password: <Password>

    remoteIP: <IP address of the GigaVUE-FM>

    remotePort: 443
  3. Restart the V Series node or proxy service. 


출처: <https://docs.gigamon.com/doclib62/Content/GV-Cloud-third-party/Deploy_nodes_openstack.html>


ubuntu@vtap-ctrl:/etc$ more gigamon-cloud.conf

Registration:

groupName: kt

subGroupName: kt

auth: Basic a3Q6Z2lnYW1vbjEyM0EhIQ==

remoteIP: 172.25.0.17

remotePort: 443

728x90
728x90


개념은 매우 간단하다. 실제 서버의 HDD를 가상머신용 디스크로 전환한 뒤, 젠서버에 업로드하는 것이다.

Citrix에서는 XenConvert라는 툴을 제공하고 있어 이런 작업을 매우 편리하게 할 수 있다.

XenConvert 역시 무료이다. 다만 로그인 후 마이페이지에서 다운받도록 되어 있다.

다운받았으면 이전할 PC(여기서는 서버)상에 XenConvert를 설치하고 실행한다.


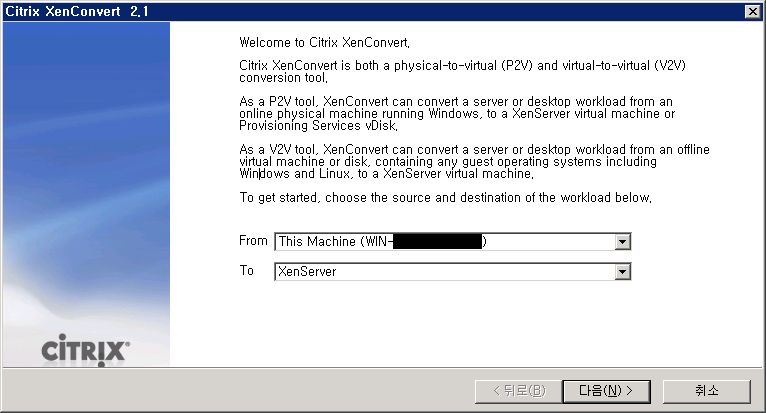
XenConvert를 실행하면 마주하는 첫 화면이다. From에 This Machine을, To에 XenServer를 선택한다. 혹 네트웍 속도가 느리거나 하여 XenServer로 바로 올리기 곤란하다면 다른 가상 디스크 형식을 선택해 우선 컨버팅 한 다음 나중에 XenCenter에서 Import 기능을 이용하면 된다.


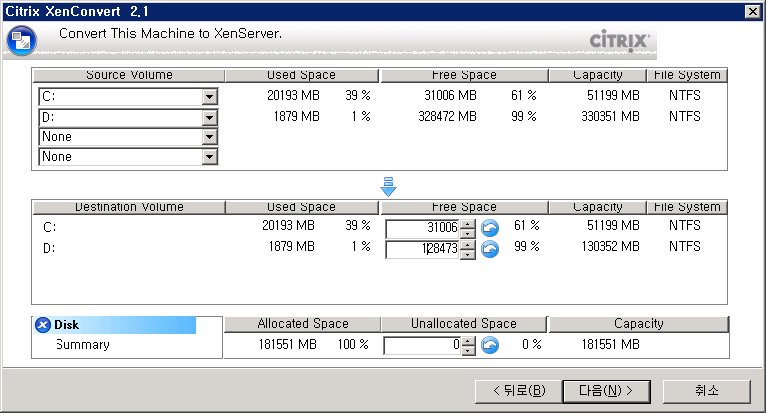
생성될 가상디스크의 크기를 조절하는 곳이다. 필자는 300GB가량 되던 것을 너무 크다고 생각해 100GB대로 줄였다.


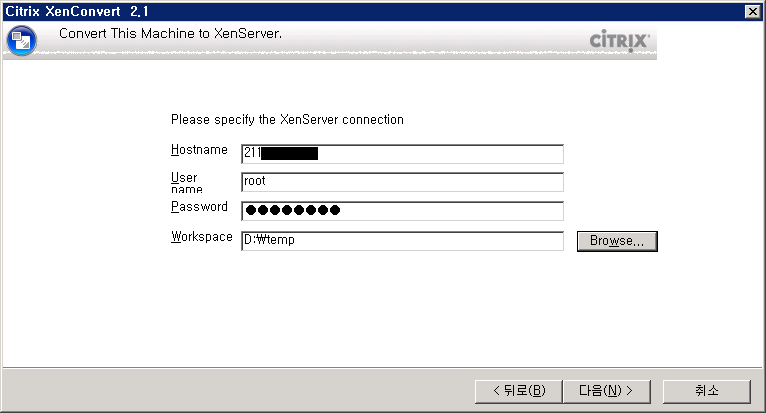
업로드될 서버의 주소와 계정, 가상 디스크가 생성될 작업 공간을 지정한다. 필자는 D:에 temp라는 디렉터리를 만들고 그곳에 지정을 했다.


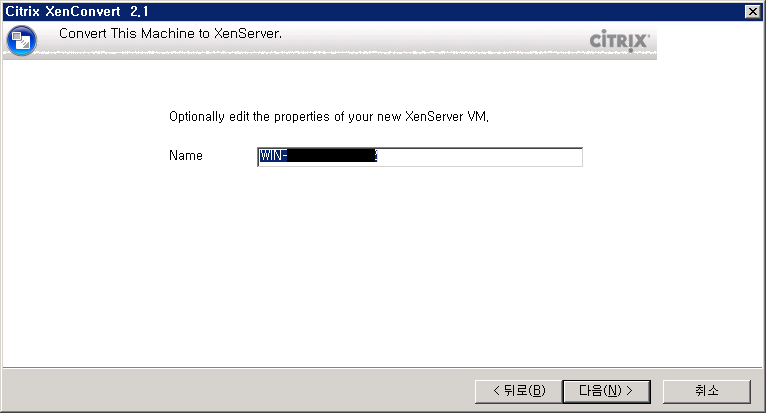
생성될 VM의 이름이다. 바꾸어줘도 되고 그냥 두어도 무방하다.


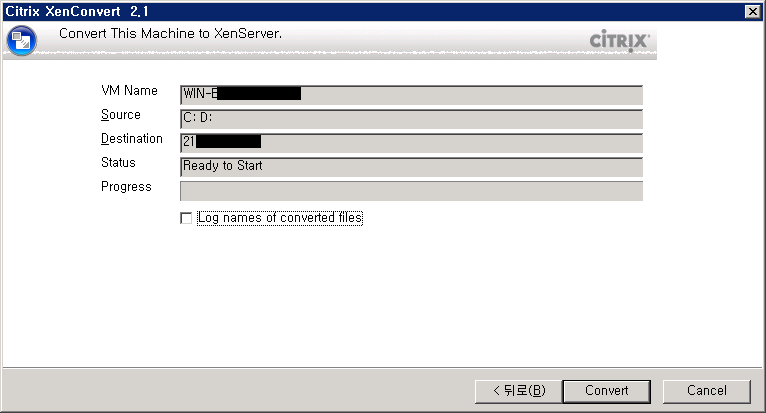
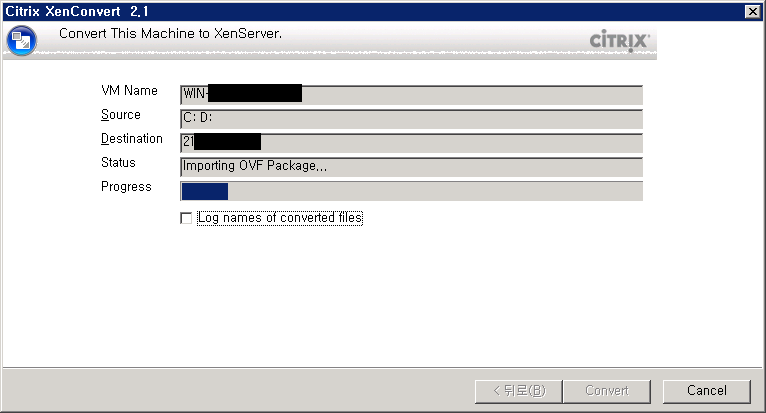
Convert를 누르면 작업이 진행된다. 이 동안 가급적 서버에서는 다른 작업을 하지 않는 편이 좋으리라 추측된다.


XenConvert에서 가상디스크를 만들고 마운트하는지, 이런 메시지가 보인다. 무시하면 된다.


간혹 이 때에 실패하는 경우가 있다. 그럴 때는 우측 하단의 Convert 버튼이 Log 버튼으로 바뀌므로, 당황하지 말고 천천히 로그를 읽어보면 된다. 아래는 필자의 경우인데, 잘 보면 서버의 기본 SR의 용량이 부족해서 업로드 할 수 없다는 내용임을 알 수 있다.

Source is D:\temp\WIN-EOOOOOOOOOO.ovf.
Destination is 211.00.00.000.
OVF to XenServer started at Sunday, April 18, 2010 18:55:05
Validating OVF Package...
FWD: Warning:2010.4.18.18.55.6,578: Disk linkage [File to RASD] does not exist: WIN-EOOOOOOOOOO.pvp
OVF Package is valid.
Importing OVF Package...
FWD: Debug:2010.4.18.18.55.9,78: OVF.FindSystemIds completed, 1 found
FWD: Debug:2010.4.18.18.55.9,187: OVF.FindRasdByType completed, 1 found
FWD: Debug:2010.4.18.18.55.9,203: OVF.FindRasdByType completed, 1 found
FWD: Debug:2010.4.18.18.55.9,421: Import.Process: DefineSystem completed (WIN-EOOOOOOOOOO)
FWD: Debug:2010.4.18.18.55.9,453: Import.SetIfDeviceIsBootable: Using HostResource to find Disk
FWD: Debug:2010.4.18.18.55.9,859: Found file WIN-EOOOOOOOOOO.vhd using VhdStream
FWD: Error:2010.4.18.18.55.10,93: OVF.UploadRawVDI: Target Storage Repository does not have enough free space. Need[190382604288] Free[60368617472]
FWD: Error:2010.4.18.18.55.10,93: Import.ImportFileProc::Exception OVF.UploadRawVDI: Target Storage Repository does not have enough free space. Need[190382604288] Free[60368617472]
FWD: Debug:2010.4.18.18.55.10,93: Import.AddResourceSettingData, recevied autoevent, continuing
FWD: Error:2010.4.18.18.55.10,93: Import.AddResourceSettingData, Failed on import, remove vm.
FWD: Debug:2010.4.18.18.55.10,93: Import.ImportFileProc (worker thread) completed
ImportFile failed
Failed to import the OVF Package.
OVF to XenServer stopped at Sunday, April 18, 2010 18:55:10
Physical to XenServer stopped at Sunday, April 18, 2010 18:55:10


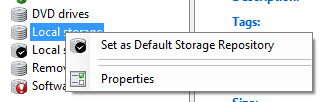
XenServer에서 스토리지의 문맥 메뉴를 열어 기본 SR을 변경할 수 있다. 그러나 이 때는 처음부터 다시 시도하기 보다 작업 공간(여기서는 d:\temp)에 기생성된 파일을 이용해 XenServer에서 import만 하는 편이 나을 것이다.


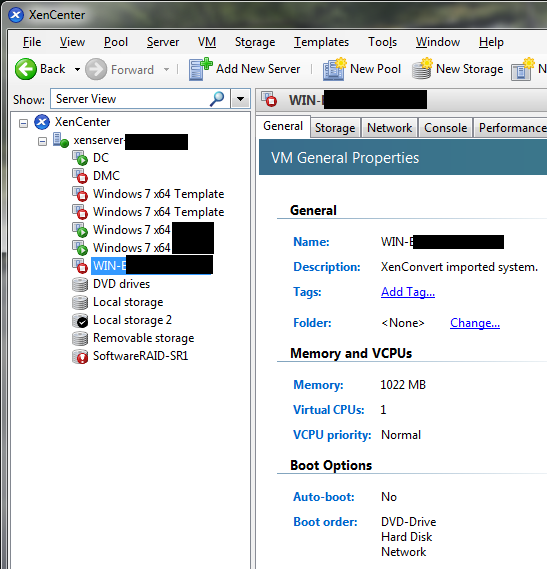
모든 작업을 완료한 화면. 방금 작업한 WIN-E... 서버가 추가되어 있다. 이제 부팅해서 XenTools를 설치해 주고, 네트웍 설정까지 마치면 된다.

728x90

+ Recent posts